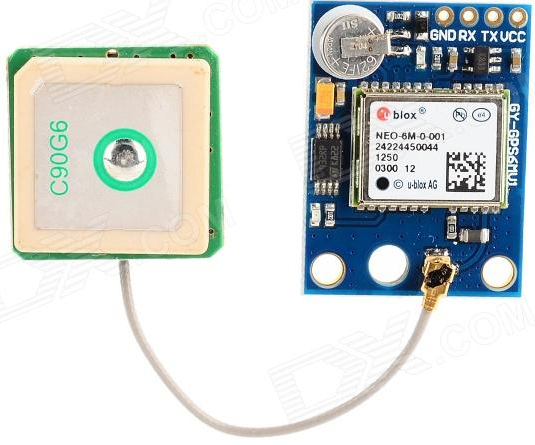
This guide will explain how to interface Arduino Uno, Nano, or any other board equipped with Atmel ATmega328p, to a Ublox Neo 6M GPS module. This module is available on Amazon, Ebay, Aliexpress and many other Internet stores, at a price starting from 10 Euro. Interfacing it to Arduino is pretty easy, since it has just 4 pins to connect: GND (0V), VCC (5V), RX and TX.
The sketch in this guide retrieves data from the Ublox Neo 6M using SWseriale library (included in the ZIP file, and also available on GitHub). The communication is performed at 9600 baud. Since Arduino Uno and Nano have only one HW serial, which is used to communicate with the PC, SWseriale library has to be used to emulate an additional UART serial port (software serial), in order to communicate with the GPS module. For this purpose, the following pins of Arduino Uno/Nano are used:
- Arduino Pin 2 = SWseriale RX -> Connect to Ublox Neo 6M pin "TX"
- Arduino Pin 4 = SWseriale TX-> Connect to Ublox Neo 6M pin "RX"
- Arduino GND -> Connect to Ublox Neo 6M pin "GND"
- Arduino 5V-> Connect to Ublox Neo 6M pin "VCC"
The data received from the GPS module can be, optionally, logged on an SD card, by using the Catalex Micro SD card module. In case you would like to use this feature, you need to set the flags in the C++ source file called "SDmgr.cpp", which is located in the "/src/SDmgr/" subfolder.
#define SD_MODULE_PRESENT 1 // Micro SD card module presence (Catalex Micro SD Card)
#define SD_CS_PIN_NUM A1 // CS pin for SD card (SPI) - Slave Select
After compiling the sketch and flashing it on Arduino Uno/Nano, you can test the communication by sending the command "d000" followed by CR or NL, or both characters. In case the GPS date (UTC) could be received properly from the Neo 6M, it should be shown correctly on the screen, as below. Please notice that some time is required to the GPS, to connect to satellites (some minutes, in case you are into a building). The date is received using UBX TIMEUTC packet polling. For more info related to the communication protocol implemented in Ublox Neo 6M, please check the official website, and the data-sheet (u-blox6 Receiver Description Protocol Specification).
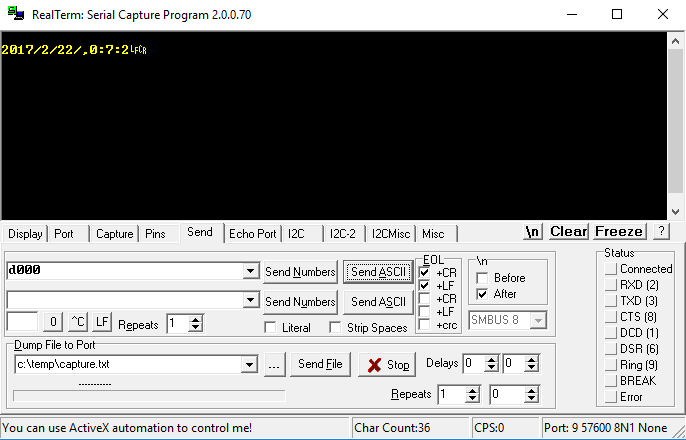
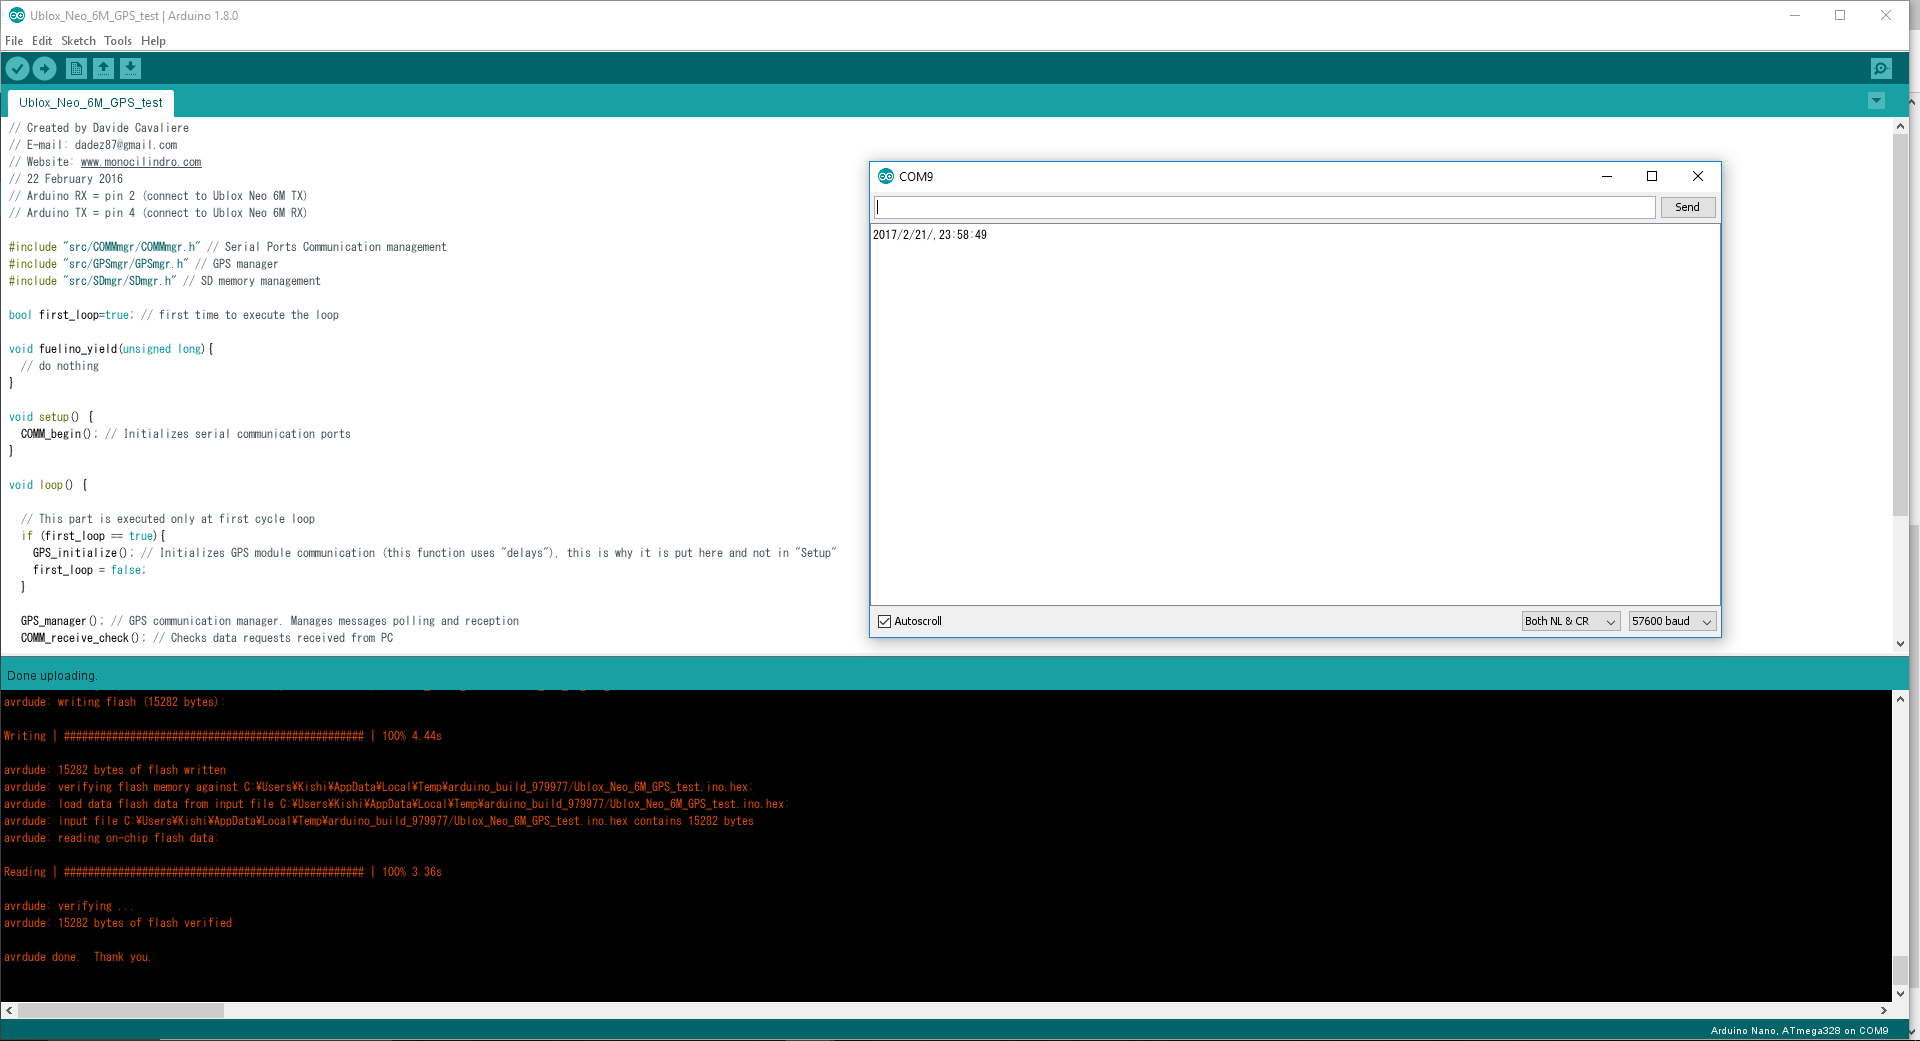 The same request ("d000") can be also performed using RealTerm. The serial communication speed to be set between Arduino and PC is 57600 baud.
 In addition to that, RealTerm allows to see the raw packets coming from the Ublox Neo 6M. First of all, set the visualization mode to "Hex [space]" and then send the command "d001": this command enables/disables the "verbose mode". If such mode is active, Arduino Nano is forwarding all data received from the GPS module, to the PC. The packets can be stopped by sending once again "d001" (this will toggle OFF the "verbose mode"). As visible below, the UBX POSLLH packet starts with HEX characters 0xB5 0x62 0x01 0x02.
 The meaning of the data written into the packet can be decoded using the following table (u-blox6 Receiver Description Protocol Specification).
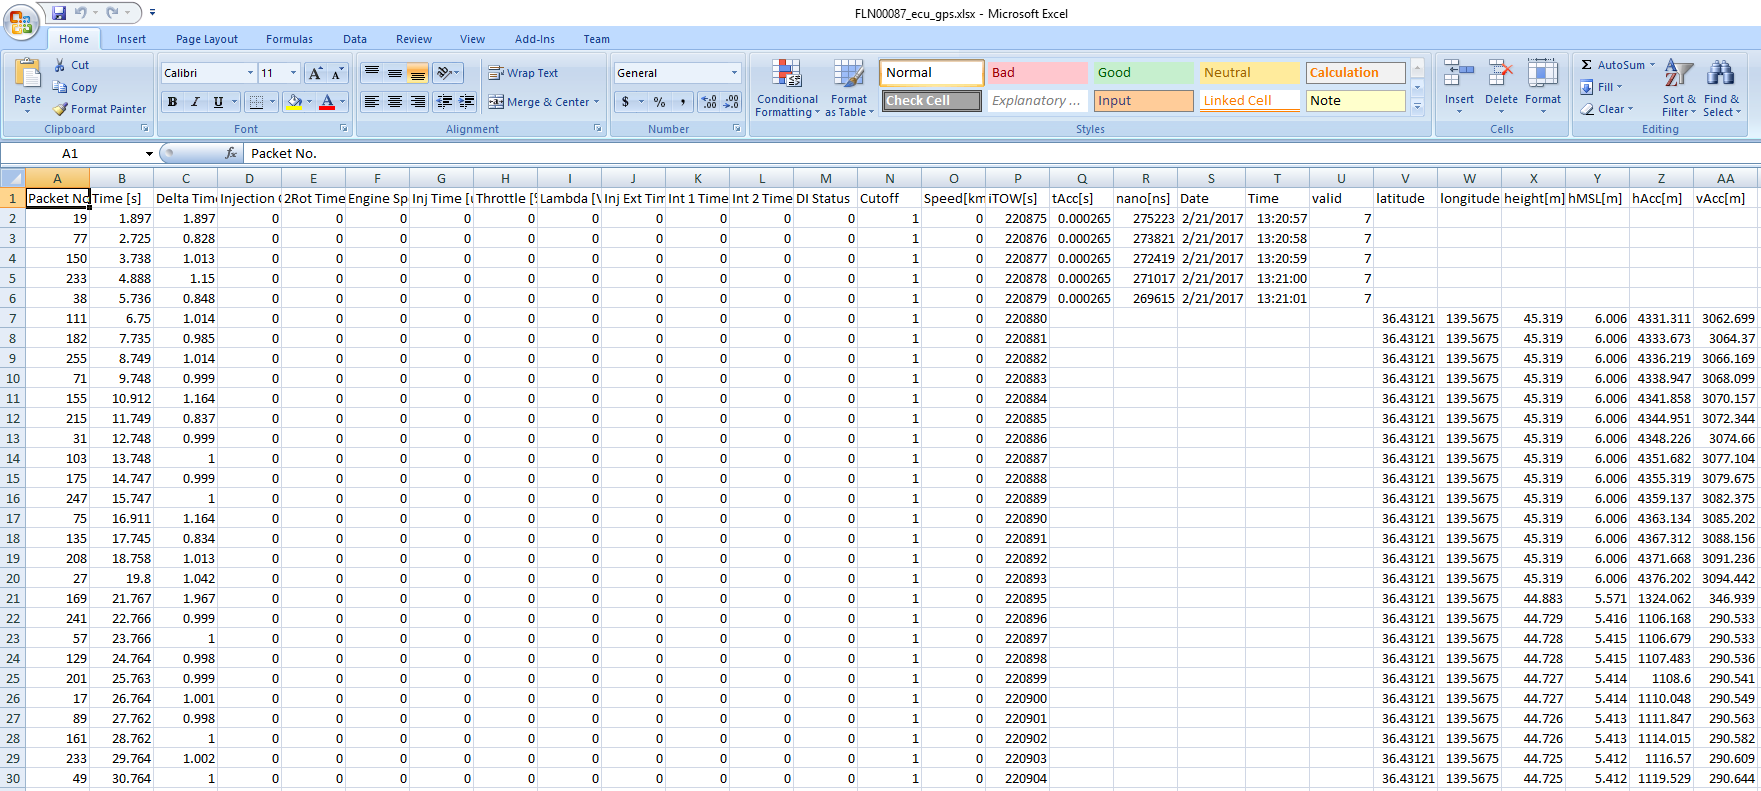
 The same data is also logged on the SD card, in case you connected a Catalex Micro SD card module (and set the "#define" fields properly, as explained above). In the SD card, there should be a binary file called "flnXXXXX.log" (in which XXXXX is a number between 00000 and 99999, which can be manually defined inside the file "SDmgr.cpp"). This binary raw file can be converted into a CSV file (ASCII) using Fuelino Log File converter, which is available here. The tool converts the GPS packets binary data (example: POSLLH, TIMEGPS, TIMEUTC) into a readable format, that you can read using Excel or Notepad.
As shown in the CSV exported file below, first of all Arduino keeps polling the GPS module using TIMEUTC queries. Once the data received is reliable (valid = 3) for more than 5 times, the queries are switched to POSLLH. Therefore, at first Arduino checks the date and time, and once it is sure about them, it starts asking for the latitude, longitude, and so on. The column on the left side, before "iTOW[s]" are not useful in this case, because they are filled with fake data (Fuelino is not acquiring engine data). About the latitude, longitude and height information, in order to make sure that these info are reliable, you should have a look at the values of hAcc (horizontal accuracy) and vAcc (vertical accuracy). If their value is reasonable, for example less than 100m, you can consider this position quite reliable.
 The Arduino sketch is available below. The complete project, including software modules to handle Serial communication, GPS module, and SD card writing, are available on GitHub, as well an in the ZIP file at the end of this article. The ZIP file includes also the latest SdFat library. In case you download the code from GitHub, do not forget to include the SdFat library inside the "/library/" folder of Arduino (inside My Documents).
|
1 2 3 4 5 6 7 8 9 10 11 12 13 14 15 16 17 18 19 20 21 22 23 24 25 26 27 28 29 30 31 32 33 34 |
#include "src/COMMmgr/COMMmgr.h" // Serial Ports Communication management #include "src/GPSmgr/GPSmgr.h" // GPS manager #include "src/SDmgr/SDmgr.h" // SD memory management bool first_loop=true; // first time to execute the loop void fuelino_yield(unsigned long){ // do nothing } void setup() { COMM_begin(); // Initializes serial communication ports } void loop() { // This part is executed only at first cycle loop if (first_loop == true){ GPS_initialize(); // Initializes GPS module communication (this function uses "delays"), this is why it is put here and not in "Setup" first_loop = false; } GPS_manager(); // GPS communication manager. Manages messages polling and reception COMM_receive_check(); // Checks data requests received from PC // If GPS packet has been received, and PC requested to continuously send the packet via Serial, once updated if ((GPS_SD_writing_request == true) && (COMM_GPS_send_req == true)) { Serial.write(GPS_recv_buffer, GPS_SD_writing_request_size); // Write GPS raw data } SDmgr.log_SD_data(); // SD card data logging, as last, after checking all data delay(10); } |
Downloads:
- Arduino sketch (code available on GitHub): Ublox_Neo_6M_GPS_test_20170222m
- Log File Converter: available here
- CSV file example: FLN00087_ecu_gps
- Ublox Neo 6M protocol manual: u-blox6 Receiver Description Protocol Specification
Hi,
Thanks for this post, it is very helpful.
I have a similar project, except it is to simply log binary messages from the GPS (not ublox) to an SD card as a .bin file.
I attempted to open your sketch and flash the Arduino but it would not compile and gave the following error:
------------------------------------
sketch\src\SDmgr\SDmgr.cpp:4:70: fatal error: SDFatYield.h: No such file or directory
#include // SD FAT management (modified SDFat library)
compilation terminated.
exit status 1
Error compiling for board Arduino/Genuino Uno.
-----------------------------
I attempted to download the SDFat.h library but cannot find anything with "SDFatYield" name.
What do you suggest?
Thanks!
I am sorry, that is my mistake. Basically, "SDFatYield" is a modified "SDFat" library, that includes a call to the function "yield()" when the SD card memory is being written and in busy state.
You have 2 ways to work around this small issue:
1) Download the original "SDFat" library from this link, and therefore modify the "#include" statement "SDFatYield.h" into "SdFat.h" -> https://github.com/greiman/SdFat
2) Download the modified "SDFat" library called "SDFatYield" from the Fuelino page (https://www.monocilindro.com/Fuelino) and use it.
After that, it should work. Please let me know.
Hi i interfaced gps with node mcu to get gps values on moving vehicle but i did not get continuous values i write the code to push the data every 30 seconds but it sends the gps values only in stabled condition. i changed 3 modules but it was repeating same problem if any suggestions to over come this problem??
Hi i interfaced gps with node mcu to get gps values on moving vehicle but i did not get continuous values i write the code to push the data every 30 seconds but it sends the gps values only in stabled condition. i changed 3 modules but it was repeating same problem if any suggestions to over come this problem??