
This guide will show you how to install and configure a Raspbian Jessie Lite OS, on your Raspberry Pi, in less than 5 minutes.
If you are looking for a cheap computer, which absorbs low power, and is even easy to configure, you should absolutely go for a Raspberry Pi 3 Model B. I bought this board on Amazon Japan, for just a bit more than 5,000 Yen (45 dollars, 40 euro).
The official specs are:
- A 1.2GHz 64-bit quad-core ARMv8 CPU
- 802.11n Wireless LAN
- Bluetooth 4.1
- Bluetooth Low Energy (BLE)
- 1GB RAM
- 4 USB ports
- 40 GPIO pins
- Full HDMI port
- Ethernet port
- Combined 3.5mm audio jack and composite video
- Camera interface (CSI)
- Display interface (DSI)
- Micro SD card slot (now push-pull rather than push-push)
- VideoCore IV 3D graphics core
The power consumption is pretty low, less than 1 Ampere of electric current @5V (Micro USB connector), which means less than 5W. If you consider that a normal desktop PC can draw hundreds of Watts, depending on its working load, you can clearly understand how low is the power consumption of this Raspberry Pi.
Once you have the board, you need, at first, to prepare a Micro SD card. I suggest at least 8GB, and Class 10, to have a good reading/writing speed and latency. Possibly, I would recommend using a good one, like Kingston, Sandisk, or similar.
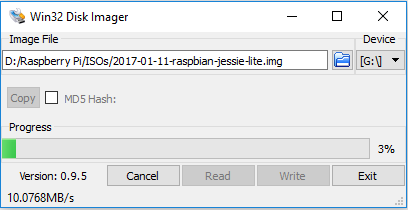
The first step to do is to download the Raspbian Jessie (or Jessie Lite) image, and write it on the Micro SD card. I suggest to use Win32 Disk Imager tool, which is free and easy to use.
 Then, connect the Micro USB cable (power supply), as well as the HDMI connector for the monitor, Ethernet cable, and USB Keyboard/Mouse. I used a Logitech/Logicool wireless keyboard.
 Then, turn the Power On, and wait for the Raspberry Pi to boot. After that, login. The username is pi, and password is raspberry.
 Run "raspi-config" to configure your new OS.
sudo raspi-config
The first step is to click on "Expand Filesystem", so that Raspbian can use the whole space available on the SD card.
 Then, you need to turn On the "SSH" communication service. I suggest also to turn Off the Serial (we don't need to log-in remotely using serial, since we will use SSH only, via Ethernet).
 Then, you can restart (raspi-config will propose you to restart, when you exit). From now on, you won't need the monitor and the keyboard anymore, so you can remove them. Only Ethernet cable and Micro USB Power Supply are needed. Therefore, you now have a "headless Raspberry Pi" (headless = no monitor = remotely controlled). In order to connect from an external PC, you can use Putty, but you should first know the IP address of your Raspberry Pi. To do so, there are many ways: one of that is to use the command "ifconfig" on your Raspberry shell (in case you did not remove the monitor yet). Alternatively, you can use your external PC and run the free tool "Advanced IP Scanner". This tool is very useful, so I would recommend you to always have it installed on you PC.
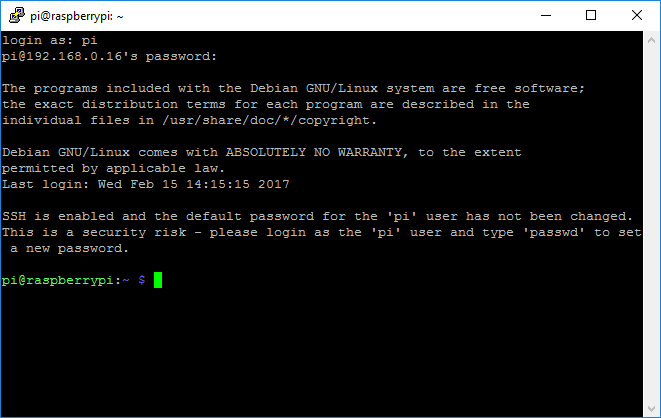
 Then, use Putty to connect to the Raspberry Pi. In my case, the IP address (given by the Internet router, which is working as DHCP server), was: 192.168.0.16. You should connect to Port 22 (SSH).
 You will get the following message about SSH cryptography certificate when connecting, just click "Yes", no need to worry.
 Pi will prompt you to input your username (pi) and password (raspberry). Then, you are ready. If you want, you can run again "sudo raspi-config" to modify your password or any other settings.
 Now that you have a working shell, you can, for example, run a repositories update, or install any new program. You can update the repositories, for example, by running:
sudo apt-get update
 A PDF guide, which also explains how to make your Raspbian Jessie [Lite] "read only", is available here: Raspberry_Pi_3_Jessie_read_only.
After performing these steps you can, for example, install other applications. I recommend you to install Samba, which allows you to access the files on your Pi (Linux) from an other PC running Windows. I already prepared a simple guide, in PDF, on how to install it: samba_raspberry_pi_3_jessie. It takes less than 10 minutes to install it. Of course, in case you want to make your Raspberry Pi "read-only", you need to install the applications before making it "read-only", otherwise any change will be lost at shutdown/reboot.