In this article I will explain how to interface an SD card module to Arduino 101. The module which I used is a CATALEX MicroSD Adapter (v1.0) and communicates via SPI communication protocol. The connection is the same as for Arduino Uno:

- GND: ground (0V)
- VCC: power supply (5V)
- MISO (Master Input Slave Output): Arduino pin 12
- MOSI (Master Output Slave Input): Arduino pin 11
- SCK (Master Serial Clock): Arduino pin 13
- CS (Slave Select): you can connect this pin to any Arduino digital output, and then write that pin number inside the function call SD.begin(). I this example, I connected it to Arduino pin 9, and then write SD.begin(9).
The following sample code was available on Arduino official website. I just had to modify the CS pin from 4 to 9, since I connected Arduino pin 9 to the slave CS pin. In order to communicate with the module, it is necessary to include SPI communication( "SPI.h") and SD module ("SD.h" ) libraries.
|
1 2 3 4 5 6 7 8 9 10 11 12 13 14 15 16 17 18 19 20 21 22 23 24 25 26 27 28 29 30 31 32 33 34 35 36 37 38 39 40 41 42 43 44 45 46 47 48 49 50 51 52 53 54 55 56 57 58 59 60 61 62 63 64 65 66 |
/* SD card read/write This example shows how to read and write data to and from an SD card file The circuit: * SD card attached to SPI bus as follows: ** MOSI - pin 11 ** MISO - pin 12 ** CLK - pin 13 ** CS - pin 9 This example code is in the public domain. */ #include <SPI.h> #include <SD.h> void setup() { // Open serial communications and wait for port to open: Serial.begin(9600); while (!Serial) { ; // wait for serial port to connect. Needed for native USB port only } Serial.print("Initializing SD card..."); if (!SD.begin(9)) { Serial.println("initialization failed!"); return; } Serial.println("initialization done."); // open the file. note that only one file can be open at a time, // so you have to close this one before opening another. File myFile = SD.open("test.txt", FILE_WRITE); // if the file opened okay, write to it: if (myFile) { Serial.print("Writing to test.txt..."); myFile.println("testing 1, 2, 3."); // close the file: myFile.close(); Serial.println("done."); } else { // if the file didn't open, print an error: Serial.println("error opening test.txt"); } // re-open the file for reading: myFile = SD.open("test.txt"); if (myFile) { Serial.println("test.txt:"); // read from the file until there's nothing else in it: while (myFile.available()) { Serial.write(myFile.read()); } // close the file: myFile.close(); } else { // if the file didn't open, print an error: Serial.println("error opening test.txt"); } } void loop() { // nothing happens after setup } |
The code is compiled and uploaded on Arduino 101. If everything goes well, a "SUCCESS" message appears. After that, about 5 seconds are needed to start the software. Arduino 101 has an Inter Curie architecture instead of the Atmel microcontroller architecture, which was present on the previous Arduino Uno: the capability of Intel Curie architecture is higher, but the it requires more time for the system to wake up after a reset.
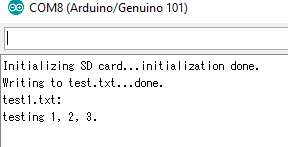
 After finishing uploading the software, click on "Tools" and "Serial Monitor" and if everything is correct, you should see the following screen.
 In case you visualize an error, such as "error opening...", make sure that the SD card has been inserted in the module, and that the wire connections are right.

thats helpful.. but im trying wemos D1 R2 board...
would u help me with the wire sketch for it board to it catalex, please?