After installing the Athena 166cc cylinder and piston bore up kit, the Kijima and Daytona air filters, and the Akrapovic carbon racing exhaust, the quantity of air inhaled by the engine has been increased. As explained in other posts, in a gasoline internal combustion engine, it is necessary to inject the correct amount of fuel (gasoline) depending on the quantity of air which the engine is breathing. This mass stoichiometric ratio is fixed (air-fuel mixture ratio), and, theoretically, should be equal to 14.7:1.
The quantity of fuel injected in the intake manifold is proportional to the time that the injector is open. During this time, the fuel, which is maintained at a high pressure by the fuel pump, can pass through the injector into the intake manifold, mix with the air coming from the air filter, and be suctioned by the piston into the combustion chamber.

The electronic circuit of the injector is very simple. The injector can be modeled as a coil, with its own electrical resistance (R) and inductance (L). The coil has two poles: from now on, they will be called (+) and (-) poles.
- The (+) pole of the injector is constantly connected to the battery voltage, through the main relay. The main relay is activated by the "Ignition Switch" (when you turn ON the motorcycle key). This means that, when you turn ON the key, the (+) pole of the injector is connected to the battery voltage (+12V nominal voltage).
- The (-) pole of the injector is connected to the "INJ" pin of the ECU. Using a "switch" (power MOSFET transitor), the ECU decides to close the circuit to GND (electrical ground), or to leave it open.
Basically, the behavior of the injector (open or close) is decided by how the ECU commands the power MOSFET.

- When the ECU closes the transistor to ground, an electrical current is free to flow inside the injector. The current increases (the increasing speed and maximum value depend on the values of R and L), and the injector opens, so the fuel can flow into the intake manifold.
- When the ECU opens the transistor, the current is not able to flow anymore into it, and it quickly decreases to zero. The injector closes, and the fuel cannot flow anymore from the high pressure pump to the intake manifold.
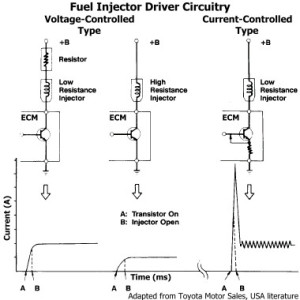
There are many types of injectors. The properties of the injector installed on the Honda CBR125R can be found in the Honda CBR125R Service Manual at page 11, and it is shown below. The CBR125R injector is a "high resistance" injector (9 – 12 Ω), and the control is a simple ON/OFF control. In other types of injectors (low resistance injectors), the control is more complicated (PWM control): at first, the injector is fed with a high voltage, in order to open it, and then the current is limited by reducing the average voltage, by means of PWM (Pulse Width Modulation). Anyway, since the injector of the CBR125R is a high resistance injector, the control is just ON/OFF, and it is pretty easy to explain.

Due to the Ohm's law, which is one of the most important laws of electrical physics, electrical current depends to the applied voltage with a proportional law. ( ) For this reason, the current flowing into the injector of the CBR125R will be about 1A, considering a battery voltage of +12V and an injector resistance of R=12 Ω.

The picture shows the waveform of current and voltage of the (-) pin of the injector. The red signal is the electrical current, while the blue signal is the voltage. As you can see, at the beginning, the ECU is not activating the transistor: no current flows in the injector, so the (+) and (-) pins have the same voltage (12V). Then, the ECU turns ON the transistor, (-) pin is shorted to GND (ground = 0V), and for this reason the voltage drops to 0V; the current starts to rise (due to the inductance L, the current does not increase instantly), and stabilizes to a maximum value, which is determined by the Ohm's law (1 Ampere in our case). Then, the ECU opens the transistor, and the current quickly decreases to 0A. However, as you can see in the picture, there is a peak in the voltage, which can be also 4-5 times higher than the battery voltage (for example, 48V). The reason of this peak is that, due to the inductance L, the current inside the coil cannot be interrupt instantly; when the transistor opens, the current cannot flow anymore into it, and it starts to decrease very quickly; this determines an induced voltage which is described by the Faraday's law: the current decreases, so the magnetic flux decreases, and this creates an induced voltage inside the coil, which is  : the voltage induced in the coil is equal to the derivative of the flux. Since the current decreases very quickly (and so does also the magnetic flux), the induced voltage can be very high, and since such high voltage is dangerous for the power MOSFET, Zener diodes are introduced, in parallel to the transistor, in order to limit the voltage to a reasonable maximum value (for example 48V). That is the reason why the voltage has a peak when the transistor is opened by the ECU.

Using a Zener diode instead of a usual "free wheeling" diode, has the pro of quickly reducing the current into the injector. This contributes to stop the fuel flow quicker than it would be if the current was decreasing slowly. As a consequence, the opening and closing control of the injector is faster, and so the injection quantity can be more accurate.
As a conclusion, in case it is necessary, after any engine modification, to change the amount of fuel injected for each combustion cycle, it becomes necessary to control the opening time of the injector, that means how much time the transistor is activated (ON state). The original ECU decides by itself which is the necessary amount of fuel to be injected for each combustion cycle, and control the injector accordingly. For this reason, in order to change the real injection time commanded to the injector, based on the original injection time coming from the ECU, it is necessary to create an additional controller which acts as a "man in the middle" between the original ECU and the injector. By doing this, it becomes possible to make the original ECU think that its signals are properly sent to the injector, while the truth is that the additional controller is commanding a longer or shorter injector period. This was the challenge which I had to face when I created my DIY additional injector controller.


SO you've just purchased your brand new Honda, and you're absolutely excited to take it out on the road for a drive. What you don't realize is